One of the things I had to do often was deciding the bootloader I was going to use to bring up VxWorks for a given embedded board. The decision sometimes was mine, and sometimes was decided directly by the OS manufacturer.
What I have found is that generally if the bootloader that you are configuring is uBoot, you will have two options. The availability of these options will depend on what is/what isn’t supported directly in the BSP for the board that you will be using:
Option 1: Flash the VxWorks bootloader from uBoot to replave uBoot
Option 2: use uBoot as the bootloader to load the kernel directly
Once you have a VxWorks kernel created, you need to make sure to have serial access to the board. You will use the serial access to configure the bootloader (VxWorks bootloader aka bootrom; or other bootloader type like uBoot). Generally you will be using directly a VxWorks bootloader, and this bootloader uses FTP to download the kernel. If you use uBoot, this bootloader uses TFTP to access the kernel.
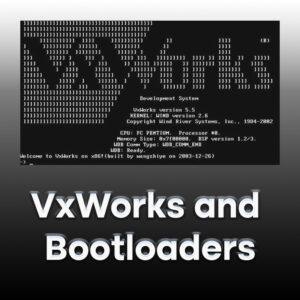
If you end up using the VxWorks bootloader, you will see something like this on your serial console:
boot device : atse>
unit number : 0
processor number : 0
host name : <your_ftp_server>
file name : <your_ftp_server/vxWorks>
inet on ethernet (e) : <your_target_ip:ffff0000
host inet (h) : <your_host_ip>
gateway inet (g) : <your_gatway_ip>
user (u) :<user>
ftp password (pw) : <password>
flags (f) : 0x0
target name (tn) : <target_name>
You will need to change each line of this bootloader. The “hostname” is the remote system where the bootloader expects to be able to mount the directory where the kernel is located. In the past our policy was to use “pawnee” (alias ftpserver) to provide access to the /local remote directory. This policy has now changed (until further notice) and we will be now installing an FTP server in the local build system where we install the VxWorks toolchain.
Note that the FTP server is generally going to be CHROOTed to a directory, and that is where your file name will be coming from.
Bootloader creation
There are different ways to create a bootloader. These depends on many factors, and it changes between operating systems and CPUs. For VxWorks there are at least three boot processes: single-stage, multi-stage and UEFI.
For instance, if the CPU is Intel, then we have to be careful with some IA requirement on the size of the bootloader (cannot not be bigger than 587K). If we comply with it, we can use the single-stage boot process. If not, we need to use the multi-stage boot or the UEFI, or else it will not work and it will go silent about it and not tell you why is not working
There are also different types of bootloader: compressed bootloaders, uncompressed bootloaders, and others that are less interesting for our purposes. The one we use normally at RTI is the compressed one.
Once we know what type of boot we need, and what type of bootloader we want, we need to understand how the bootloading process work, what programs and binaries do we need to build, what components, and where to locate those.
For the single/multi stage boot, the BIOS look for a bootstrap bootloader in the MBR(Master Boot Record), also called sector 0 of the device that the BIOS is booting from.
In that sector we need to flash/store an x86 16-bit assembly program called bootstrap bootloader, that VxWorks call vxld.
The BIOS transfer execution to the vxld, which will try to find and locate within the device a file called “bootrom.sys”. If there is no file called like this, it will just not work.
The bootrom.sys is the bootloader that we have to build ourselves. See? We build a bootloader, but this is not the only one that exists in the start-up process. This is useful information to have for an embedded platforms engineer, should start-up problems arise at setup time.
The process to create the bootloader differs from BSP to VxWorks version. But in general, you will need to create a VxWorks project using the BOOTAPP profile (if the BSP supports it), and add the bundle associated to that board so that the bootloader knows the specifics about the hardware. You will also need other components, like the network (if you are booting from FTP server), and others depending on the board and BSP.
We need to differentiate between bootrom and bootapp concepts, but this is way too complicated to explain here. Ask me for details 🙂
If you created a single-stage bootloader image, then you will rename that image to “bootrom.sys” and copy that into the root directory of your boot device (hard-disk, USB, etc).
If your image is bigger than 587K and your board is Intel, then you are in bad luck, and you need to use a multi-stage boot process, which takes a bit more time.
By now, you know that there will be three actual bootloaders:
⦁ Bootstrap boot loader: vxld (provided by WindRiver)
⦁ First Stage boot loader: you need to build it. You will rename this to bootrom.sys
⦁ Second Stage boot loader: you will rename it bootapp.sys (see the bootapp confusing naming? 🙂 )
You need to make sure that the First-Stage boot loader is flashed/installed first in the device before the Second-Stage (order in memory is important).
I mentioned above that the BIOS will transfer execution to the vxld, and this one will locate bootrom.sys. This will only happen if we are actually under a single-stage boot. If we are under a multi-stage boot, then bootrom.sys will then try to locate bootapp.sys, which will be the actual bootloader image we built with the VxWorls shell or with Workbench.
If we are using the UEFI boot, then the BIOS needs to support UEFI. This is usually needed for secure environments. Just note for now that you will need a completely different bootloader and a different location. Ask for details if interested.
Focusing on single/multi stage boots, the bootloader we build will be a compressed one, however this is not totally 100% compressed. It contains also a small uncompressed section. When the vxld bootstrap bootloader transfer execution to the bootrom file, what it actually does is:
⦁ First, it initializes memory in the RAM.
⦁ Second, it actually decompresses the other part of the bootrom.sys file to that RAM and transfer execution to it.
⦁ This is what will actually bring up the VxWorks shell with the booting parameters to be able to load a VxWorks image.
Añade aquí tu texto de cabecera
Lorem ipsum dolor sit amet, consectetur adipiscing elit. Ut elit tellus, luctus nec ullamcorper mattis, pulvinar dapibus leo.
